How to build a paver patio: a complete step-by-step guide
A paver patio is one of the few big hardscaping jobs a determined homeowner can genuinely do alone. The pavers themselves are the easy part — what decides whether the patio is still flat in ten years is the base underneath and the slope you build into it. This guide walks the full sequence, from marking out to locking the joints, with the material quantities for each layer.
What you are actually building
Almost every failed paver patio fails for the same reason: someone treated it as a surface instead of a structure. A patio is four layers, and only the top one is visible.
| Layer | Depth | Job |
|---|---|---|
| Compacted subgrade | — | The foundation everything else sits on |
| Gravel base (crusher run) | 4–8 in | Carries the load and drains water away |
| Bedding sand | 1 in exactly | Levels the pavers — nothing more |
| Pavers | 2⅜–3⅛ in | The wearing surface |
| Polymeric jointing sand | Full joint | Locks the field together, blocks weeds |
The gravel base does the structural work. The sand is a levelling course and carries nothing. Confusing those two roles — usually by making the sand thicker to "save digging" — is the single most common way a patio ends up rutted within two seasons.
Materials and tools
Nothing here is exotic, but two items are worth renting rather than improvising: a plate compactor and a wet saw. Hand-tamping a base does not achieve real compaction, and an angle grinder makes slower, dustier, less accurate cuts than a wet saw.
Materials
- Crusher run gravel (also sold as road base or QP) — angular, with fines
- Coarse concrete sand to ASTM C33 — not play sand
- Concrete pavers in your chosen size and pattern
- Polymeric jointing sand
- Edge restraint and 10-inch spikes
- Landscape fabric (optional, over soft or clay subgrade)
Tools
- Plate compactor (rental) and a compactor mat for the final pass
- Wet saw or masonry saw (rental)
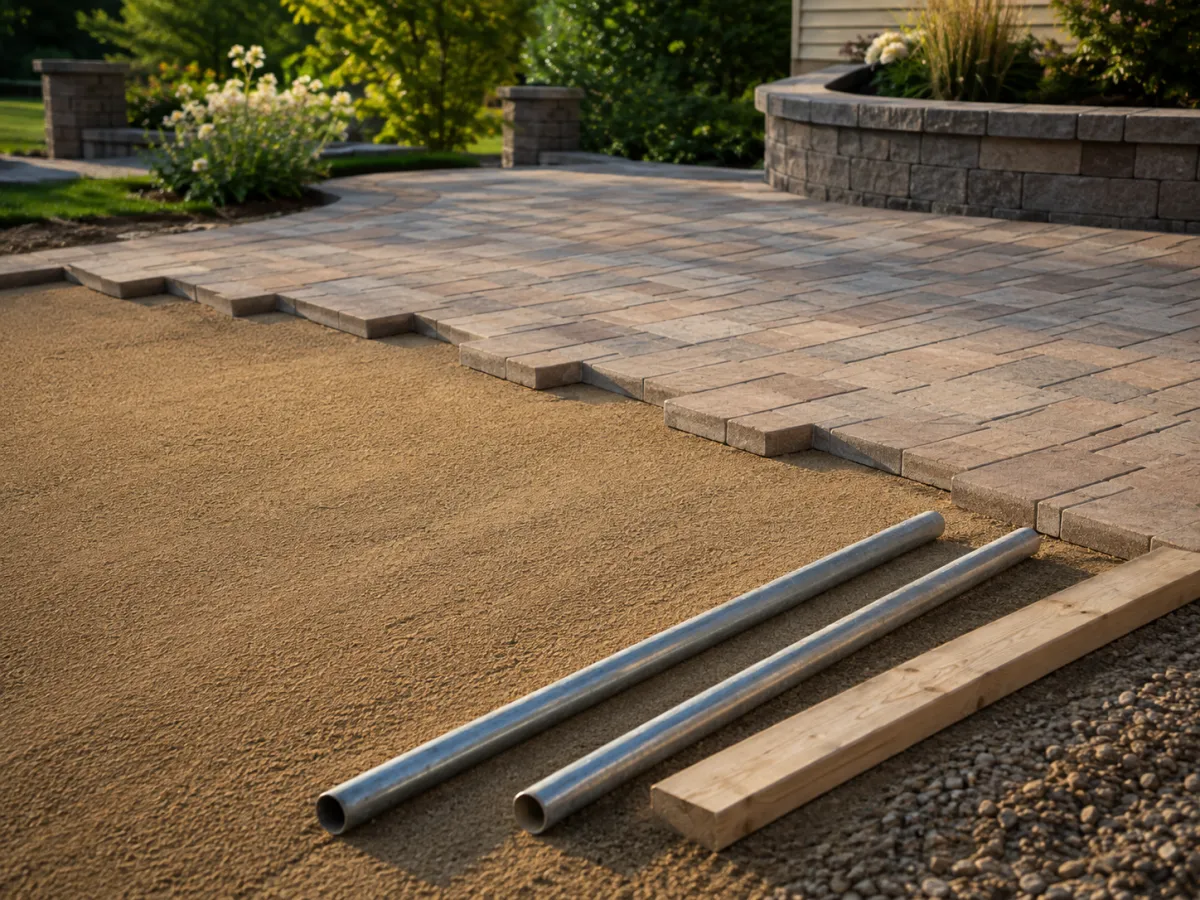
- Two lengths of 1-inch pipe or conduit for screed rails, plus a straight 2×4
- Stakes, string line, line level, tape measure
- Shovel, hard rake, wheelbarrow, broom, rubber mallet
How much of everything you need
Work out quantities before you dig, because the base depth you choose changes both the excavation and the gravel order. The table below assumes a 6-inch base, 1 inch of bedding sand, and 6 × 9 inch pavers with a 10% waste allowance.
| Patio size | Area | Pavers | Gravel | Bedding sand |
|---|---|---|---|---|
| 8 × 10 ft | 80 sq ft | 235 | 2.07 tons | 0.33 tons |
| 10 × 12 ft | 120 sq ft | 352 | 3.11 tons | 0.50 tons |
| 12 × 16 ft | 192 sq ft | 564 | 4.98 tons | 0.80 tons |
| 12 × 20 ft | 240 sq ft | 704 | 6.22 tons | 1.00 tons |
| 16 × 20 ft | 320 sq ft | 939 | 8.30 tons | 1.33 tons |
Paver size changes the count dramatically. The same 192 sq ft patio needs 951 of the 4 × 8 in brick size, 845 at 6 × 6 in, 564 at 6 × 9 in, or just 212 at 12 × 12 in — all with 10% waste included.
Enter your own dimensions rather than rounding from the table — the three calculators cover every layer.
Use the paver calculator for the surface count and waste allowance, the gravel calculator for the base tonnage, and the sand calculator for the bedding layer. If you are still choosing a size or pattern, how many pavers do I need covers how layout changes the count.
Step 1. Plan and mark out
Decide the finished size first, then check it against your paver size. A patio dimensioned in whole pavers needs far less cutting — adjusting a planned 12 ft width by three inches can eliminate an entire row of cuts.
Drive stakes at the corners and run string at the finished paver height. Then set the slope: about ¼ inch of fall per foot, always away from the house. Over a 16 ft run that is 4 inches of total drop. Lower the string at the far end by that amount and check it with a line level — this string is the reference for everything that follows.
Step 2. Excavate to depth
Total excavation is base depth + 1 inch of sand + paver thickness, measured down from your finished height.
| Use | Base depth | Total excavation |
|---|---|---|
| Patio or walkway, firm soil | 4 in | about 7 in |
| Patio, clay or poorly drained soil | 6 in | about 9 in |
| Driveway or vehicle loading | 8 in | about 12 in |
Dig about 6 inches wider than the finished patio on every side. The edge restraint has to sit on compacted base, not on loose soil, and that overdig is what gives it something solid to spike into. Keep the excavated floor at a consistent depth and carry your slope down through it — you are not creating the slope later, you are creating it now.
Step 3. Compact the subgrade
Run the plate compactor over the bare soil in overlapping passes until it stops visibly moving under the plate. Walk it afterwards: if you leave footprints, it is not compacted.
If the subgrade is soft clay or stays wet, lay landscape fabric across it now. It separates the soil from your gravel so the two do not mix over time, which preserves the base's drainage.
Step 4. Lay and compact the gravel base
This step decides the lifespan of the patio, and it is the one most often rushed.
Add crusher run in 3 to 4 inch lifts and compact each lift fully before adding the next. A plate compactor cannot densify more than about 4 inches at a time, so a 6-inch base dumped in one go is compacted on top and loose underneath — which is exactly how a patio develops dips a year later.
| Base depth | Gravel per 100 sq ft |
|---|---|
| 4 inches | 1.23 cu yd / 1.73 tons |
| 6 inches | 1.85 cu yd / 2.59 tons |
| 8 inches | 2.47 cu yd / 3.46 tons |
Check your slope with the string line as you build up, not at the end. A lightly dampened base compacts better than a bone-dry dusty one, but do not soak it. For more on base depth and material selection, see how much gravel you need under a slab.
Step 5. Screed exactly 1 inch of bedding sand
Lay two lengths of 1-inch pipe on the compacted base, parallel and a little less than your screed board apart. Fill between them with coarse concrete sand, then drag the 2×4 across the rails to strike the sand off perfectly flat. Lift the rails, fill the grooves they leave, and smooth by hand.
One inch. Not two, not three. The full reasoning is in how much sand you need for pavers, along with why play sand fails here.
Step 6. Lay the pavers
Start from the longest straight edge — usually the house — and work outward. That puts your cut pavers at the far perimeter where they are least visible, rather than in the middle of the view.
Set each paver straight down into position. Do not slide it into place, because sliding ploughs sand ahead of the paver and ruins the flat bed you just screeded. Leave the joint spacing your paver's edge lugs create, or your chosen gap if you are spacing them deliberately.
Snap a chalk line or check against your string every few rows. Small drifts compound: by row twenty an unnoticed lean can be an inch out of square, and it will be obvious in the finished patio.
Step 7. Cut the edge pavers
Lay whole pavers over the area to be cut, mark the line against the neighbouring course, and cut with a wet saw. Cutting after the field is laid is far more accurate than measuring each gap in advance.
Waste depends almost entirely on your pattern. A straight running bond in a rectangle needs about 5% extra; a 45° herringbone needs 10–15% because every perimeter paver becomes an angled cut with an unusable triangular offcut; curves push it to 15–20%. This is why the paver calculator has a waste field, and why leaving it blank is a mistake.
Step 8. Install edge restraints
Fit the restraint tight against the outer pavers, sitting on the compacted base you overdug for, and spike it every 10 to 12 inches. On curves, use the flexible type and cut the relief notches as needed.
It is tempting to skip this, since the patio looks finished without it. Do not. Without restraint the perimeter pavers migrate outward with every freeze-thaw cycle and every heavy load, the joints open, and the field unravels from the outside in. It is the cheapest insurance on the entire project.
Step 9. Compact and lock the joints
Run the plate compactor over the laid pavers with a protective mat fitted, in two or three passes across different directions. This seats the pavers into the bedding sand and brings the surface truly level.
Then sweep polymeric sand into the joints, working it in with a stiff broom until every joint is full to just below the chamfer. Compact once more so the sand settles, and top up any joints that drop.
Finally, activate the sand with water exactly as the bag directs. Two rules matter here: the pavers and joints must be completely dry when you sweep the sand in, or you will get a haze on the paver faces that is difficult to remove; and follow the bag's watering sequence precisely, because over-watering flushes the binders out.
Common mistakes
- Thin base, thick sand. Sand carries nothing. Adding sand instead of gravel produces a patio that ruts under a chair leg.
- Dumping the base in one lift. Anything over 4 inches must go down and be compacted in stages.
- No slope, or slope toward the house. Build ¼ inch per foot into the subgrade and base, not into the sand.
- Compacting the bedding sand. Screed it, lay on it, compact through the pavers at the end.
- Skipping edge restraints. The field spreads and the joints open within a season or two.
- Ordering pavers in two batches. Shade varies between production runs; order the whole job at once and keep about ten spares.
- Regular sand in the joints. It washes out and grows weeds. Use polymeric.
What it costs
For the 12 × 16 ft patio in the table above — 192 sq ft, 6-inch base:
| Item | Quantity | Cost |
|---|---|---|
| Pavers | 564 (192 sq ft) | $384–$1,152 |
| Gravel base | 5.48 tons | $110–$246 |
| Bedding sand | 0.88 tons | $22–$35 |
| Polymeric sand | 3–4 bags | $75–$160 |
| Edge restraint | about 56 ft | $112–$224 |
| Materials total | roughly $700–$1,800 |
Add delivery on the gravel and sand, and two or three days of compactor and saw rental. Professional installation for the same patio typically runs $10–$25 per square foot, or roughly $1,900–$4,800 — which tells you how much of the cost is the labour in those first four steps nobody sees.
Frequently asked questions
How deep do you dig for a paver patio?
Add your base depth, 1 inch of bedding sand, and the paver thickness. For a foot-traffic patio on firm soil that is 4 inches of base plus 1 inch of sand plus a 2⅜ inch paver, so roughly 7 inches. On clay or wet ground use a 6-inch base and dig about 9 inches. For a driveway carrying cars, use an 8-inch base and dig about 12 inches.
What gravel do you use under a paver patio?
Angular crushed stone with fines, sold as crusher run, road base, or QP. The jagged faces lock together and the fines fill the gaps so the layer compacts solid. Never use pea gravel or other rounded stone under pavers, because rounded stone rolls under load and never firms up.
How thick should the sand be under pavers?
Exactly 1 inch of coarse concrete sand, screeded flat and left uncompacted until the pavers are laid. A thicker layer lets pavers rut and settle unevenly, which is one of the most common causes of a wavy patio.
Do you compact the sand before laying pavers?
No. Screed the bedding sand flat and leave it loose, lay the pavers on it, then run a plate compactor over the finished pavers with a protective mat. Compacting bare bedding sand undoes the flat surface you just screeded.
What slope does a paver patio need?
About ¼ inch of fall per foot, running away from the house. Over a 16 ft patio that is 4 inches of total drop. Build the slope into the subgrade and the gravel base rather than trying to create it in the bedding sand.
How long does it take to build a paver patio?
For a first-time builder, plan on two to three weekends for a patio of around 200 square feet. Excavation and base preparation take the most time and are the least visible, but they determine whether the patio stays flat.
How much does a paver patio cost to build yourself?
For a 12 × 16 ft patio, materials run roughly $700 to $1,800: pavers at $2 to $6 per square foot, about $110 to $246 of gravel, $22 to $35 of bedding sand, $75 to $160 of polymeric sand, and $112 to $224 of edge restraint. Professional installation typically runs $10 to $25 per square foot, or roughly $1,900 to $4,800 for the same patio.
Do I need edge restraints on a paver patio?
Yes. Without edge restraints the outer pavers creep outward with every freeze and every load, joints open, and the whole field loosens from the perimeter inward. Spike the restraint into the compacted base every 10 to 12 inches.
Helpful resources
These authoritative sources cover paver installation standards and base preparation in more technical detail.
- 10-Step Guide to Installing Pavers (PDF) Source: Oregon State University Extension. Excavation depth, the 4 to 6 inch base, and the 1-inch sand bedding layer.
- Application Guide for Interlocking Concrete Pavements Source: Concrete Masonry & Hardscapes Association. The industry authority on base, bedding sand, and installation standards.
- Installing Concrete Pavers Source: Iowa State University Extension and Outreach. Step-by-step coverage of the bedding layer and which sands to avoid.
Conclusion
A paver patio rewards patience in the parts nobody photographs. Excavate deep enough, compact the base in lifts, hold the slope, screed exactly an inch of sand, and restrain the edges — do those five things and the laying is the easy afternoon at the end.
Before you order anything, run your dimensions through the paver calculator, the gravel calculator, and the sand calculator. Three calculations, and the whole patio is planned down to the last bag.