How to build a retaining wall: base, backfill, and drainage
Retaining walls fail for one of two reasons: a base that was too shallow, or water that had nowhere to go. Neither is visible once the wall is built, which is why so many walls look perfect for two years and then start to lean. This guide covers the full sequence for a segmental block wall — with the base trench depths, gravel volumes, and block counts worked out for you.
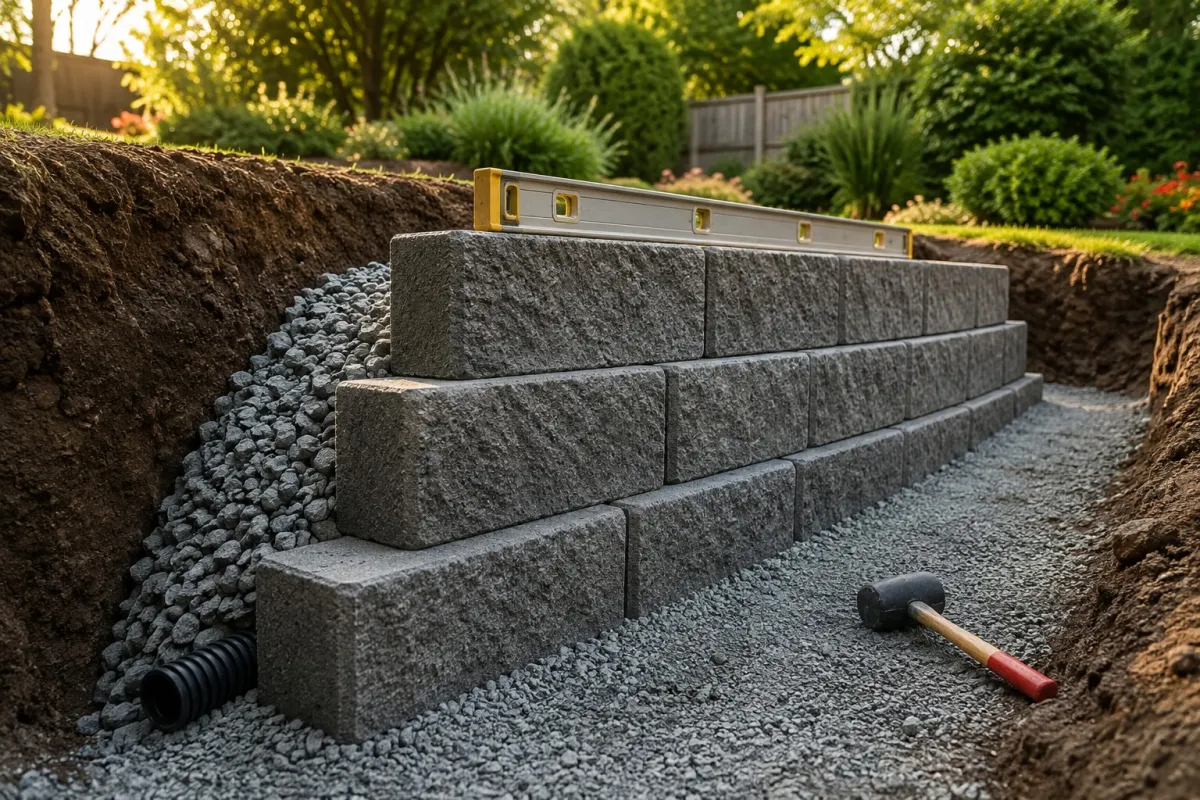
Before you dig: the height question
This is the one part of the job you cannot calculate your way around. In many areas, walls up to roughly 3 to 4 feet can be built without engineered drawings — but the threshold varies by jurisdiction, and some places require a permit well below that.
Height is not the only trigger. A wall carrying a surcharge — a driveway, a steep slope, a pool, or a structure above it — should be engineered regardless of how short it is, because the load pressing on it is far greater than soil alone. Terracing two shorter walls instead of building one tall one is often simpler, cheaper, and safer than it looks.
What you are actually building
A block wall is a gravity structure. It holds back soil through its own weight and the way it leans into the slope — not through adhesive or pins. Four things make that work.
| Element | Spec | Job |
|---|---|---|
| Compacted base trench | 6 in + ⅛ of wall height | Stops the wall settling or tipping forward |
| Buried first course | Entirely below grade | Anchors the base against sliding |
| Drainage chimney | 12 in of clean stone | Relieves water pressure behind the wall |
| Setback (batter) | about 1 in per course | Leans the wall into the slope it retains |
Miss the drainage and water saturates the soil behind the blocks. Saturated soil weighs far more than dry soil and exerts hydrostatic pressure against the back of the wall — the single most common cause of a block wall bulging outward.
Materials and tools
The critical detail is that you need two different gravels, and they are not interchangeable.
Materials
- Segmental wall blocks — the lip or pin type that creates setback automatically
- Cap blocks and masonry adhesive
- Crusher run (road base) — for the base trench, because it compacts solid
- Clean #57 stone — for the drainage chimney, because water must pass straight through
- 4-inch perforated drain pipe
- Non-woven landscape fabric — separates stone from soil
Tools
- Plate compactor (rental) and a hand tamper for the trench corners
- 4 ft level, torpedo level, rubber mallet
- Masonry saw or block splitter for cuts and the cap course
- Shovel, mattock, wheelbarrow, stakes and string line
How much of everything you need
Figures below assume a 24-inch wide base trench, a 12-inch clean stone chimney behind the wall, and standard 12 in wide × 8 in high block faces.
| Wall | Base trench | Backfill stone | Total gravel | Blocks (+5%) |
|---|---|---|---|---|
| 10 ft × 2 ft | 0.56 cu yd | 0.74 cu yd | 1.81 tons | 32 |
| 15 ft × 2 ft | 0.83 cu yd | 1.11 cu yd | 2.72 tons | 48 |
| 20 ft × 3 ft | 1.11 cu yd | 2.22 cu yd | 4.67 tons | 95 |
| 25 ft × 3 ft | 1.39 cu yd | 2.78 cu yd | 5.83 tons | 119 |
| 30 ft × 4 ft | 1.67 cu yd | 4.44 cu yd | 8.56 tons | 189 |
| 40 ft × 4 ft | 2.22 cu yd | 5.93 cu yd | 11.41 tons | 252 |
Add 10% to the gravel for compaction losses. Block counts already include 5% for cuts and breakage.
Base trench and backfill are two separate gravel calculations — do them as two rows.
Use the gravel calculator for both the trench and the chimney, the sand calculator if you set the first course on a thin levelling course, the soil calculator for backfilling the terrace behind the wall, and the concrete calculator if your design calls for a poured footing instead of a compacted base.
Step 1. Mark the run
Drive stakes at each end and run a string at the finished wall line. For a curved wall, lay a garden hose in the shape you want and mark along it with spray paint — curves are more forgiving than straight runs, because small alignment errors are invisible.
Work out your course count now: wall height in inches divided by block face height. A 3 ft wall in 8-inch block is 4.5 courses, so you either build to 4 courses at 32 inches or 5 at 40 — and remember the first course is buried, so a 5-course wall shows 4 above grade.
Step 2. Dig the base trench
Two dimensions matter.
| Wall height | Trench depth | Trench width |
|---|---|---|
| 2 ft | 9 in | about 2× block depth |
| 3 ft | 10 in | about 2× block depth |
| 4 ft | 12 in | about 2× block depth |
The rule behind those numbers is 6 inches plus one eighth of the finished wall height. The width gives you working room behind the blocks for the drainage chimney, and it gives the base something to spread load into rather than a narrow slot.
Keep the trench floor level along its length. On sloping ground, step the trench down in increments of one full block height rather than following the slope — each step keeps its own level run.
Step 3. Compact the trench floor
Run the plate compactor along the bare trench floor in overlapping passes until the soil stops moving. Walk it afterwards: visible footprints mean it is not compacted. This is soil you will never see again, and every millimetre it settles later shows up as a lean at the top of the wall.
Step 4. Lay and compact the gravel base
Fill the trench with crusher run in 3 to 4 inch lifts, compacting each lift before adding the next. A plate compactor only densifies about 4 inches at a time, so a 10-inch base placed in one go is firm on top and loose underneath.
Bring the base up to the height that leaves your first course fully below finished grade, then check level along the whole run with a 4 ft level. Chase this until it is genuinely flat — the next step depends entirely on it.
Step 5. Level the first course
This is the step that decides the wall. Every error here multiplies upward: a block 3 mm out of level at the bottom is a visibly crooked course by the top.
Set each block and check it front to back and side to side, tapping down with a rubber mallet and adding or removing a little base material as needed. Check against the neighbouring block as well as the level. Expect this course to take as long as all the others combined; that is normal and it is time well spent.
Step 6. Install the drain pipe
Lay 4-inch perforated pipe behind the first course, sitting on a bed of clean stone, with the perforations facing down. That seems backwards to most people: the holes face down so water rising through the stone enters the pipe from below and is carried away, rather than the pipe only collecting what falls directly into it.
Slope the pipe at least 1% toward an outlet where it can daylight — the end of the wall, a lower part of the yard, or a drain.
| Pipe run | Fall at 1% |
|---|---|
| 10 ft | 1.2 in |
| 20 ft | 2.4 in |
| 30 ft | 3.6 in |
| 40 ft | 4.8 in |
A pipe with no fall is a trough that holds water against the wall, which is worse than no pipe at all.
Step 7. Stack the courses with setback
Lay each course in running bond so the joints offset from the course below, like brickwork. Cut blocks at the ends as needed rather than leaving a stack of aligned vertical joints, which is a structural weak line.
Sweep every course before you stack on it. A single stone chip left on a block tilts the one above and the error carries all the way up.
The setback happens automatically with lipped or pinned block — roughly 1 inch per course:
| Wall height | Courses (8 in) | Total lean back |
|---|---|---|
| 2 ft | 3 | about 3 in |
| 3 ft | 4–5 | about 4 in |
| 4 ft | 6 | about 6 in |
Step 8. Backfill with clean stone as you go
Do not stack the whole wall and then backfill. Work course by course: lay a course, then fill a 12-inch wide chimney of clean #57 stone directly behind it, then compact the native soil beyond that stone with a hand tamper.
Line the boundary between stone and soil with non-woven landscape fabric. Without it, fines migrate into the stone over a few seasons and the drainage chimney silts up — at which point you have a wall with no drainage and no way to fix it short of dismantling.
Never run the plate compactor directly on the stone immediately behind the blocks; it can push the course out of alignment. Hand-tamp within about a foot of the wall.
Step 9. Cap the wall and grade behind it
Glue the cap blocks down with masonry adhesive, overhanging the face slightly so water drips clear of the wall rather than running down it. Cut caps on curves with a masonry saw for tight joints.
Finally, grade the soil behind the wall so surface water runs away from the top. A wall with perfect internal drainage still fails if the yard funnels every storm over its back edge. Top the last few inches with compacted soil rather than stone, so runoff sheds sideways instead of pouring into the chimney.
Common mistakes
- No buried first course. The bottom course must sit fully below finished grade. Building straight off the surface leaves nothing resisting the base sliding forward.
- One gravel for both jobs. Crusher run compacts and drains poorly; clean stone drains and compacts poorly. Use each where it belongs.
- Skipping the fabric. Soil fines wash into the stone and the drainage chimney silts up within a few years.
- Drain pipe with no fall. A level pipe stores water against the wall instead of removing it.
- Rushing the first course. Every error compounds upward. Slow here saves rebuilding later.
- Compacting hard against the blocks. Hand-tamp the last foot; a plate compactor will shove the course out of line.
- Building too tall without engineering. Height limits exist because gravity walls have real structural limits. Terrace instead.
What it costs
For the 20 ft × 3 ft wall in the table — 95 blocks, 5.13 tons of gravel including waste:
| Item | Quantity | Cost |
|---|---|---|
| Wall blocks | 95 | $285–$760 |
| Gravel (base + backfill) | 5.13 tons | $103–$231 |
| Levelling sand | 0.17 tons | $4–$7 |
| Drain pipe & fabric | 20 ft | $40–$90 |
| Caps & adhesive | 20 ft | $60–$150 |
| Materials total | roughly $492–$1,238 |
Add gravel delivery and two to three days of compactor and saw rental. Professional installation typically runs $25–$60 per face square foot, which for this wall's 60 face square feet is roughly $1,500–$3,600.
Frequently asked questions
How deep should a retaining wall base be?
A common rule is 6 inches plus one eighth of the finished wall height. For a 2 ft wall that is about 9 inches, for a 3 ft wall about 10 inches, and for a 4 ft wall about 12 inches. The trench should be roughly twice the block depth wide, and the entire first course must sit below finished grade.
How much gravel do I need behind a retaining wall?
Allow a 12-inch wide chimney of clean stone running the full height and length of the wall, plus the base trench. A 20 ft long, 3 ft high wall needs about 1.11 cubic yards for the trench and 2.22 cubic yards for the backfill, so roughly 3.33 cubic yards total, or about 4.67 tons. Add 10% for compaction.
Do I need a drain pipe behind a retaining wall?
For almost any wall retaining soil, yes. Water building up behind a wall creates hydrostatic pressure, which is the most common reason block walls bulge and fail. Lay 4-inch perforated pipe behind the first course on clean stone, holes facing down, sloped at least 1% to a point where it can daylight.
How high can I build a retaining wall without an engineer?
In many jurisdictions walls up to about 3 to 4 feet can be built without engineered plans, but the threshold varies and some areas require a permit at lower heights. Any wall carrying a surcharge — a driveway, slope, or structure above it — should be engineered regardless of height. Check your local building department before you dig.
What gravel goes behind a retaining wall?
Use clean angular stone with no fines, commonly sold as #57 stone, for the drainage chimney directly behind the blocks, because water needs to pass straight through it. Use crusher run, which contains fines and compacts solid, for the base trench underneath the wall. The two materials do different jobs and are not interchangeable.
What is setback on a retaining wall?
Setback is the slight backward lean built into the wall as it rises, usually created automatically by a lip or pin on the block. At a typical 1 inch per course with 8-inch high blocks, a 3 ft wall leans back about 4 inches in total. The lean directs the wall into the slope it retains rather than away from it.
How many blocks do I need for a retaining wall?
Divide the wall length in inches by the block face width, then the wall height in inches by the block face height, and multiply. With standard 12-inch wide by 8-inch high blocks, a 20 ft long, 3 ft high wall needs 20 per course across 4 courses, so 90 blocks, or about 95 with a 5% allowance for cuts and breakage.
How much does a retaining wall cost to build yourself?
For a 20 ft long, 3 ft high block wall, materials run roughly $492 to $1,238: about $285–$760 for 95 blocks, $103–$231 of gravel, a few dollars of levelling sand, $40–$90 for drain pipe and fabric, and $60–$150 for caps and adhesive. Professional installation typically runs $25–$60 per face square foot, or roughly $1,500–$3,600 for the same wall.
Helpful resources
These sources cover segmental wall standards and drainage design in more technical detail.
- Concrete Masonry & Hardscapes Association resources Source: CMHA. The industry authority on segmental retaining wall and hardscape construction standards.
- Base preparation and compaction (PDF) Source: Oregon State University Extension. Excavation, compaction in lifts, and base material selection.
- Drainage and erosion control practices (PDF) Source: Wisconsin Department of Agriculture, Trade and Consumer Protection. Subsurface drainage principles and outlet design.
Conclusion
Everything that keeps a retaining wall standing is buried before the wall looks like anything: a base trench deep enough for the height, a first course that is dead level and below grade, a chimney of clean stone with fabric behind it, and a pipe that actually falls somewhere.
Before ordering, run your wall through the gravel calculator twice — once for the trench, once for the backfill — and use the soil calculator for whatever you are filling behind it. If your design uses a poured footing, the concrete calculator handles that too.